Wednesday, March 31, 2010

A [starving] Bunny Foo Foo & felt fruit!


Aren't these and these just adorable?! I thought I'd take a whack at some bunny making for Evie, since it is Easter and all. My bunny looks malnourished... but it was still made with love and I got to use the cutest argyle fabric that I've been saving! Sure the buttons are crooked, the bottom isn't straight, and a seam is already busting... but hey, he's cute anyways! Or she?


Thankfully this next project turned out much better! I decided to try making fruit out of felt when I saw this tutorial for a felt tomato. Then I made the carrot (with slight variation), and loved it! I thought I'd be adventurous and try making my own grapes, which I thought would be extremely difficult but they turned out pretty good! Evie thinks it's hilarious when I act like Roger Rabbit and eat the carrot, then she tries it herself. Too cute =) When she's older and starts playing "kitchen" I'll probably make her even more goodies. I see a whole cabinet full of felt food in our future!


And below is just a cute picture of her gazing out the window while I take a picture of her fruit. Cuteness Monster!

Tuesday, March 30, 2010

Evie's 1st Birthday!

My little girl turned 1 year old on March 20th... I refuse to believe it! It seriously just seems like I was pregnant yesterday. At about 9:00 am that morning I said to Taylor, "It was one year ago from now that I was holding her for the first time..." then I got all emotional as I think every mother does on their baby's first birthday. I remember that first cuddle so clearly. They handed her to me while I was in the recovery room after the c-section and it was true love. I felt more at home with her in my arms then ever. I just wanted to hold her and stare at her for eternity! And every time I woke up or she woke up from a nap it felt like Christmas morning when I was a little kid, only that feeling times 10! I just couldn't get enough of that sweet little face. But, back to the present time: She's just growing so fast and is getting to be such a smart little kid. Some recent "tricks" she's doing is bouncing a ball to me (or near me), and she hugs her stuffed animals! I say, "Give Pooh Bear hugs!" and she gives him a huge snuggly hug. SO cute! We just had a little Birthday party for her with Taylor and me and had cake and she opened her presents. We got her a strawberry ice cream cake... delicious, but cold! Even though her fingers were freezing she devoured her slice of cake and made the biggest mess! We had to throw her right in the tub before presents. She was very dainty with the opening of presents... I'm sure that will change as the years go by! I got her the most adorable set of embossed wooden alphabet blocks. Every child should have a set of these! While she just throws them around and knocks them down right now, I know they'll grow with her and help her learn. They have numbers, letters, math symbols, and animal imprints.

Below are more pictures from the party and pictures from her "I'm 1!" photo shoot we did in our backyard. They turned out really well I think! Enjoy =]


She got a little distracted while eating her cake and decided the purple bow must come off! She succeeded... and the bow was destroyed.


Monday, March 22, 2010

Drowning in a Lake of Coins

I worked at Starbucks for about 3 years, and sometimes I start to miss it, then I read this old blog of mine I posted on myspace a long time ago to cure myself. And pardon the language, I sure did swear a lot back then! Either that or I was just really fed up with my job =]


Saturday, June 07, 2008

"Drowning in a lake of coins."
Current mood: ready to strangle some bitches.

I said i wouldn't post a blog complaining about stupid people who come to starbucks...but alas...

I'm SO sick of stupid bitches completely ignoring me as they're paying me at the drive thru window. They're either talking on their expensive phone or talking to the person next to them and sometimes won't even LOOK at me let alone talk to me or, heaven forbid, say "thank you...i know i'm a fucking whore, so thank you for tolerating me." Like, if you're gonna be a bitch to me at least order your drink right so you don't look like an ignorant snob. Just a normal snob. But no...you have to order like you just walked out of a barn don't you?

"Um can i get like...a care-a-mel frappacino with like extra extra care-a-mel inside the cup and double the whipped cream?"

"What size?"

"Umm....the big one? Vente? Venti? Whatever the big one is? With extra care-a-mel and double the whipped cream."

"So you want a venti caramel frappacino with extra caramel? We can't really do extra whipped cream because you already have a venti size...we don't make bigger lids for extra whipped cream."

"Ok, just with extra care-a-mel then."

"Ok you're total is $4.30 we'll see you at the window."

"Extra care-a-mel right?"

"Yup see you at th-" (cut off because she drove away before i could finish my DAMN sentence.)

Then i see the idiot at the window and she just holds out her money before i even OPEN the window! Then i have to reach out 4 feet because her dumb ass can't drive to save her life. Poor girl in her Lexus...she just can't seem to turn and pull up next to the window...sad. and wait...oh wait...whats that?! You want to pay me in change?! Oh my god i would LOVE to take your billion pennies off your hand for you! NOT. I would NOT like this but i'm going to pretend i love it. And i'm ALSO going to pretend that i love when you don't look at me and rip your drink from my hands and drive off without saying thank you. MMMmmm thats the BEST!

gah!

/rant

Sunday, March 14, 2010

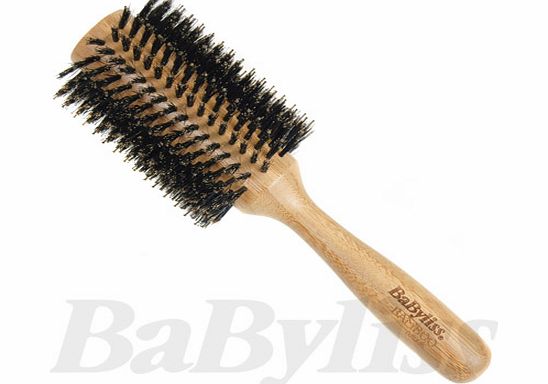
Curly Brush from Hell!

A woman's worst nightmare:


This.
Thing.
Is.
Junk.

I use it (yes, I still use it, what choice do I have?) to blow dry my hair to add volume and a bit of a curl at the ends. Only there is one huge design flaw in these hairbrushes. Not just this specific one, all of them! When you have your hair wrapped around it holding the brush with one hand, holding the dryer with the other, you are supposed to turn it round and round. Inevitably, some hair comes off and falls to the side (toward the handle). Which would be fine if there wasn't a stupid crack where the top of the brush was put together with the brush handle! These tiny crevices trap any loose hair thats fallen off the brush and rips it out when you twirl it! How did the geniuses at the salons NOT figure that out?! Why isn't the brush head and body all ONE piece? Riddle me that! Yes, I want to use these brushes but no I don't want to loose 5% of my hair every time I do! Not only do I like my hair actually in my scalp, but it hurts when pieces are torn randomly from my head! Pain is beauty? Um no. Not when this stupid problem can be fixed so easily. Below is an example of a great brush, however the bristles aren't the right kind. I've tried these brushes, they don't work... they just rub your head. Why are all of these solid-body brushes equipped with the wrong bristles? To piss me off, obviously!


And check out this green beauty! See the white band in between the brush head and the brush handle? Now there's two cracks for even MORE hair loss! Awesome! What the hell is that white band for? Decoration? Nicely done. I totally want to buy this brush because of the fancy handle. Not. Who is inventing these things anyways? Men? Men who don't have a clue what would make the perfect brush because their hair is 2.5 inches long?


So, what's my solution? I've tried taping around the deadly-crevice-of-doom, but because most of these cracks are on a curvy part of the brush, I can't get the tape to go on right, so instead of the crack ripping out my hair, the tape does. Neat. I've also tried wrapping hair ties around the crack, but that led to the same result as the tape.

Every time I go through the hair-product isle I look for the brush of my dreams. But alas, no one has been smart enough to invent it. Meanwhile, I will continue to try rigging my brush to fit my needs (my needs being to NOT have my hair ripped from my person). Hmmm... maybe I should whip out the hot glue gun...

$50 bucks to the person who find me the perfect round hair brush!

Thursday, March 11, 2010

Text Addict Baby


*If text is too small, click on image to see larger version*

Wednesday, March 10, 2010

Brownies: Crumbly but delicious


Here is a recipe for brownies that I found from Fresh Home magazine. Pretty delicious!

Ingredients:
1 stick unsalted butter
2 squares unsweetened chocolate
1 cup sugar
2 eggs
1 tsp vanilla extract
1/4 cup all-purpose flour
1/2 tsp salt
1/2 cup semi-sweet chocolate chips

Ready, set, go:
1. Preheat oven to 325*F. In a small saucepan set over low heat, melt the butter and chocolate squares together. Once melted, remove from heat immediately and stir well.

2. Pour the contents of the saucepan into a medium mixing bowl, then stir in sugar/eggs/vanilla. Beat well.

3. Stir in the flour/salt/chocolate chips. Combine well, then lick the beater (try not to devour the whole bowl, no matter how good it tastes!) Pour into a greased and floured 8x8" baking pan. Bake for about 35-40 minutes, or until a knife inserted into the middle comes out clean. Piece of cake... err... brownie!

4. After baking, let brownies completely cool before cutting and removing from pan. Then enjoy with a tall glass of cold milk =]


Now, my batch contained unsalted walnuts, but I think I added to many, so if you add some, use only about 1/2 cup or so, or your brownies will have a hard time sticking together (hence the crumbliness of mine). If you don't like nuts, try adding other things for uniqueness! Almond extract, a small package of instant coffee, dried fruits (cherries?), or Resee's chunks! Mmm.

Thursday, March 4, 2010

Green Apple Tree Applique How-To


Materials you will need:
-One sheet of Iron-on "steam a seam" (fusible webbing)
-Scissors
-Thin plain white paper
-Pencil
-Iron & Ironing board
-Green fabric or felt
-Brown fabric or felt
-Dark pink fabric for bird body
-Light pink fabric for bird wings
-Assorted green buttons
-Thread to match fabrics
-Pins & needle
-Embroidery hoop
-Blank t-shirt or onesie

TIP: Pre-wash all your fabrics (especially if you're using felt) and the t-shirt to avoid awkward shrinkage (that's what she said).


Step 1: Draw the apple tree on a piece of blank, thin white paper. Draw it to scale using the t-shirt or onesie as a guide to the size you want. The bird will be the hardest part to do, so you don't want it TOO small. This shirt is an 18month onesie with the bottom cut off to make a t-shirt. You can do whatever design you want for the tree, I liked the look of a simple circle.


Notice in the picture below that the lines are over lapping each other. This is necessary for the next step, so there is no need to erase lines that should be hidden.


Step 2: Trace each piece of the picture separately onto the sheet of fusible webbing (trace onto the smooth side, not the bumpy side). Make sure to leave enough space in between pieces to cut out each piece with room to trim. You won't need the initial tree drawing anymore.


Step 3: Cut out each piece from the fusible sheet, leaving room for trim all the way around. Lay each piece on it's corresponding fabric and cut fabric to size (as shown).


Step 4: To iron the steam a seam, place the bumpy side of the sheet (the side you didn't trance onto) against the WRONG side of the fabric (the side that won't be showing on the shirt). Bumpy side to wrong side. Don't mess this part up! Iron for 10-15 seconds or following the instructions on your brand of fusible webbing. Iron each piece to its corresponding fabric.


Step 5: Following the line you traced onto the sheet, cut out each piece of fabric, trimming off the excess. ***Edit: My bird beak and eye turned out to be too small to sew the fabric on, so I just used thread to make them, as you'll see in the end photo***


Step 6: You should now have all the correct cut outs for your tree and bird!


Step 7: Peel away the sheet from each piece of fabric, leaving a sticky residue on the wrong side of the fabric. This is what will fuse the fabric to the t-shirt when ironed.


Step 8: You are now ready to iron on the fabric to the shirt. Iron one layer at a time starting with the bottom layer. So, first iron on the circle, iron for 20 seconds and then place and iron the tree trunk, etc.


Step 9: Use an embroidery loop to pull the fabric tight to make it easier to stitch around the applique. When sewing onto a shirt it's easy to accidentally grab up the back of the shirt, so tuck the shirt up around the loop (as shown) as much as you can to avoid having to undo stitches.


Step 10: Use your corresponding thread to stitch around each piece of fabric. Big stitches for the bigger pieces, small stitches for the wee little bird. Use a thimble! For the beak and eye of the bird I just sort of winged it and stitched a little dot and a little triangle using black thread, it worked pretty well! If you are using embroidery thread, it comes in six strands, so you'll need to peel them apart and just use one.


Step 11: Now time for cute buttons... err... I mean, green apples! =) I used various colors of greens and yellows in different sizes for more whimsy. After all, not every apple that falls from a tree is the same, right? Using the embroidery loop again, arrange the buttons where you want them. Once you are satisfied with their placement you can either take a picture to refer back to or use pins (as shown) to keep them in place. Sew one button at a time and careful not to prick yourself with the other pins!


Step 12: You are done! Give the shirt one last iron to get out the wrinkle caused by the embroidery loop, stick on your cute little one, and then step back and admire your craftiness! *high five!*


Other Ideas: For a boy shirt just take out the bird and use less girly fabrics (like felt). For a very girly shirt, do a pink tree with pink and purple buttons for apples with a different color tree trunk!

This may seem like a lot of work for a t-shirt that will only be worn for a short time, as children grow like weeds. No worries! Save the shirt for another child, a quilt for your child, or cut out the square of t-shirt and frame it for your child's room! As you can see I've already gotten another use for the one I made since it is the the picture for my blog =]

Start to finish to starting again? What's that?

I am frustrated.

I have a million things I want to do.
I have a ton of things I can do.
I have a hundred things I am doing.
But I have ZERO things I want to keep doing.

Is it a lack of motivation? I really don't think so. For it to be a lack of motivation I would be stopping at "a ton of things I can do" (meaning I have everything necessary to do these things but I won't even start doing them). But I am doing things, so I have motivation... I just don't seem to have the urge to keep on doing these specific things.

For example, I had this great idea to make appliques for Evie's clothes. I did three, then I stopped. I plan to do more... (story of my life), but I just don't LOVE doing it. They turned out so cute, they're not hard to do, and I have all the materials to do them... so why don't I love doing it?! Again... story of my life!

I seem to be inspired a dozen times a day to do these awesome things, and I start some of them, but I don't keep with it... what's wrong with me? Why can't I find something I love doing and just DO it and not go off on other tangents and do other things that distract me? I just want to have one thing to love doing and I want to do that thing! Plenty of people seem to get that lucky, so why not me? My father-in-law is a retired wood shop teacher, he loves making things... so he makes things all the time! He doesn't make a couple things and then never pick it up again. Why can't that be me?

I get all flustered cause I have so many projects buzzing in my head that eventually I just stop and sit down and get on the computer. Like right now. Here I am writing this blog when 15 minutes ago I was making something. I have a stack of cd's to use for crafting that I was going to make a circular mobile with to be hung around our dining room light (which is just a white circle). I was going to put two cd's together so the shiny sides are on the outside, wrap fabric around them (leaving some of the shininess poking through), and hang them in a circle at different lengths around the light. But for some reason once I got started, the idea didn't appeal so much to me anymore. I'm sure I'll force myself to finish it after I'm done with this blog. Yippee.

Then maybe after that I'll get out the sewing stuff again to make more appliques for shirts for Evie. After all, I have all the stuff I need to do it, so I should do it right? But isn't crafting supposed to be fun? I had fun at first... why did that go away? I shouldn't have to force myself to do fun things!

I don't know what I'm saying anymore. I just wish I had one thing I wanted to do forever that I would never get sick of doing.

The end.

Tuesday, March 2, 2010

Toaster... or Death Trap?

This is going to be quite a rant. I hope you're ready for it. It is long overdue.

WHY in the world do people release products without first testing them out? From toasters to hairbrushes to dvd players. I can name numerous things I've purchased over the years that seem fine when you buy them, but when you get it home and use it a couple times you realize it is a piece of junk and that whoever manufactured it never actually had people test it out. And the sad thing is, most of the things I find wrong with these products are only very minor problems that could've easily been fixed!

An example of one of these shit-listed items is a toaster I had. Reasonably priced and nice in appearance it seemed like the perfect toaster for me. After all, I just needed it to toast my bread... really any toaster would do, right? Wrong. When I tried to use it, a regular sized piece of bread wouldn't fit in it! You had to stuff it in! Then when it was done toasting it couldn't pop up because it would get stuck down inside. So you had to try and get it out without burning yourself, eventually ripping little pieces of the top off until you finally end up turning the toaster upside down over the sink and shaking it out. And you could just forget about toasting a delicious piece of sourdough! There's no way in hell you could stuff one of those in! Your only option would be to put your two pieces in long ways, wait until it pops up, then flip them over and toast the other side... resulting in an inevitably overly toasted middle and one side colder then the other so the butter you put on it doesn't melt properly. Even sadder still is that this is not the only toaster that I've seen do this. In fact... most toasters are made too small. After all, adding a couple inches to the length would require more materials, which would cost more. And it's all about makin' the big bucks you know? Anyway, I decided I was fed up so I went to buy a new toaster that I knew would easily fit a piece of bread. Amongst the tiny toasters there was a lone toaster. An Oster toaster... with extra long slots and extra awesomeness, and it is now my new prized possession. It even fits the extra long pieces from a loaf of sourdough. The toaster of all toasters!

***If you too suffer from Tiny Toaster Depression (TTD), don't be ashamed. Seek help. You can find the solution to your problems right here. Don't wait another minute.***


Return next week for shit-listed Item #2: Curly Brush from Hell